There are many times when design elements cause mail pieces to get a higher rate of posting or be refused for mailing completely. This can be both frustrating and expensive, so it’s important to know the correct requirements for designing mail pieces, how much they might cost to produce, and any mistakes to avoid.
Mailing Requirements
Requirements vary by mail type, whether it be a postcard, booklet, brochure, or envelope with something inside it. In order to know the correct dimensions, weight, and shape for your design, you must follow the correct mailing guidelines.
You can find the USPS Direct Mail Requirements here:
https://about.usps.com/publications/pub600/pub600_006.htm
or for a simplified version, check here:
https://www.businessprinting.com/how-to-design-for-direct-mail.html
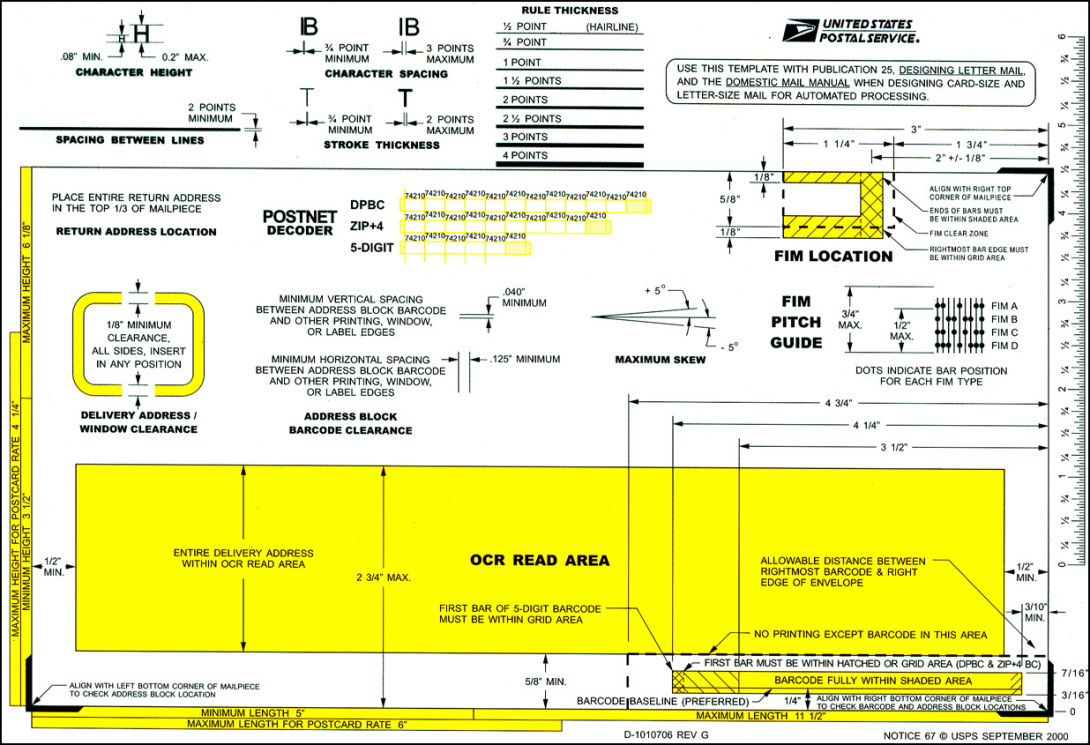
USPS also provides a multi-purpose template for determining the automation compatibility of letter-size mail pieces. A clear plastic overlay simplifies address placement, identifies the barcode clear zone, and includes positioning marks for facing identification mark (FIM) patterns. The template contains a POSTNET barcode decoder, and other automation readability features, including character height and spacing gauges. You can use this to determine if your mail piece meets the dimensions for letter-size mail. A slot on the template measures maximum thickness and also indicates the aspect ratio (length divided by height) requirements for automated processing.
Budget Implications

Direct mail costs can vary greatly from one project to another. Your budget will be determined by the mailer format, print/mail quality, level of personalization, and postage rate. It will also depend on the agency, freelancer, consultant, or other service provider you hire. Actual costs for these creative services can range from less than $1,000 up to $10,000 and more depending on the complexity and provider. Costs for production can range from $0.50 up to $2–$3 per piece. This also depends on the quality and quantity.
One thing to take into consideration is that if a mail piece you designed cannot be processed efficiently on the USPS equipment, you may be penalized with higher postage costs and slower mail delivery, or even worse – denied mailing at all.
Top 10 Mistakes to Avoid

1. Not meeting minimum/maximum mailing dimensions
Cards, letters, and flats all have a minimum and maximum dimension size that will be compatible for mailing. If you ever find yourself questioning whether something you’ve designed or produced meets a certain USPS processing category, you should share a sample with a postal expert to confirm.
2. Black/dark colored backgrounds
Like dimension standards, mail pieces must meet contrast and reflectance standards outlined in the DMM (Domestic Mail Manual). Addresses and barcodes often cannot be read by the automation equipment if printed on a dark background, taking the piece out of circulation. If you’re producing a piece with a background color of anything but white or a pale tint, you’ll want to take the ink to USPS for review. They will give you feedback on whether the addresses and barcodes will be able to be read by their machines.
3. Screenings/imaging
Print reflectance requirements must be met by both the barcode and the surface it is printed on. This ensures that the barcode can be read and interpreted by the machines during processing. If you are designing a piece that has screens, printed image, or dark fibers in the paper, you’ll want to bring a mockup that mimics the image or screens to USPS for review of any potential problems.
4. Return address placement
Not only is it important to include a return address, but it matters where you place it. The return address is always printed on the front of the mailing piece, and be sure it’s not placed too close to the OCR (Optical Character Reader) area, which is where the outbound address is printed. The outbound address should always be printed in the OCR area. If the return address is too close to this area, many people have reported their mail being sent right back to them. Once again, if you are unsure of where these placements go, you can take a full mockup of your design to USPS for review.
5. Text/graphics in the barcode clear zone
The importance of the barcode clear zone is just as important as the OCR area. Pay attention to any additional text or graphics that might come too close to these areas. It might be a great design, but it can be even greater if the cost isn’t offset due to additional postage. If you’re ever worried that your elements might be bleeding into unwanted territory, USPS workers will review your work for any issues and let you know if you should omit anything from the piece.
6. Postcard design
Postcards are just a sheet of paper. They’re simple and effective, but the most questions asked in mailing design revolves around the postcard dimensions. The answer is that the only formal USPS Postcard postage rate is for 1st class mail; there is no specific “Postcard” rate in marketing mail. If you intend on mailing a postcard as 1st Class mail, a 1-ply postcard needs to be .007″ thick (this is equivalent to a 7 pt. paper stock). Dimension-wise, the postcard needs to conform to the letter rate mail pieces design specifications.
7. Insert shift
The insert(s) that go into envelopes always need to be shallower than the width of the envelope opening. The address will be the top-facing component in an outer envelope with a window, so we must consider that “float” or “insert shift” that will occur and observe if it will cause an issue with readability of the address block. Be sure the vendor responsible for imaging has a production sample of your windowed outer envelope onsite when they are preparing your setup. They should test place your address vehicle along with all the other components of the mail piece.
8. Folded self-mailer construction
If you’re designing a Self Mailer, the rules are a bit complicated, so contact your production firm and/or a USPS MDA for guidance. The USPS has a Self Mailer Guide which is a good place to start to understand these requirements: https://postalpro.usps.com/node/2711
9. Address placement on enveloped, polywrapped, or card-style flats
Like Self Mailers, this is another case where you will want to ask for guidance if you’re not familiar with the design and addressing requirements.
10. Procedure for requesting a uniquely-assigned BRM Zip+4 Code
All Business Reply Mail must contain a uniquely assigned Zip+4 Code to separate them from the customers regular mail. This is so the USPS can obtain payment for the pieces. To obtain a BRM+4 code, you must do the following:
- Open a BRM permit or bring in a receipt from an existing BRM permit from another Post Office
- Complete Section I of the PS Form 6805 and bring it to that Post Office
- The clerk will complete Section II of the form
- The District AMS office will issue a unique BRM Zip+4 code for you, sign section 3, and return it to the clerk
- The clerk will notify you and provide you a copy of the completed form, the instructions for the ABRM tool, and the phone number and the email of the MDA Helpdesk if help is needed with the ABRM tool.
In design, I often don’t think too much about mailing requirements simply because I don’t design mail pieces often. However, I recently did a project where we had to create postcards for family and friends. My postcards revolved around Spotify’s Wrapped at the end of every year, and each postcard was to be sent to a different user with their yearly wrapped. I created one for my sister, Krystal, and actually did want to send it to her since she lives in Mount Pleasant. I realized that since I designed these postcards as if they were Spotify’s, I designed it with a US Paid Postage Stamp rather than leaving a space for a regular stamp. Of course, I couldn’t send this myself, so I had to cover the area with a regular postal stamp to get the job done. Maybe I can get Spotify to hire me and I can actually design things with that Paid Postage Stamp.
I hope this blog has given you a bit more insight into designing for mail pieces and how to make sure your mail doesn’t cost an arm and a leg or get refused for mailing completely.
References
https://www.mw-direct.com/blog/posts/the-ultimate-technical-guide-on-mailpiece-design/
https://www.businessprinting.com/how-to-design-for-direct-mail.html
https://www.productionsolutions.com/blog/top-10-direct-mail-design-mistakes-to-avoid